弥生モバイルチームのtijinsです。
MisoaアプリにNavigationコンポーネントを導入してActivityとFragmentが複雑に絡み合った状況を改善しようと思ったのですが、アプリのデザインがActivity毎のThemeで定義されていて、単純にNavigationを入れると見た目が変わってしまう問題に行き当たりました。
ThemeをFragment毎にすれば同じ見た目を実現できるはずなのですが、ThemeもStyleも全くワカランって感じで1ヶ月近く悩んでいたので、1ヶ月悩んだ結果を紹介します。
この記事の概要
このブログでは、以下の内容を説明していきます。
- FragmentにThemeを適用する方法
- ステータスバーの色をFragmentのThemeで制御する方法
- ステータスバーの文字・アイコン色をFragmentのThemeで制御する方法
- この記事の概要
- ThemeとStyle
- FragmentにThemeを適用する
- ステータスバーの色をFragmentのThemeで指定する
- ステータスバーの文字を黒色にする
- サンプルコード
- まとめ
- お知らせ
ThemeとStyle
背景色や文字サイズなど、アプリの見た目を一括して設定できる機能です。
デフォルトのプロジェクト構成ではres/theme.xmlに保存されています。
theme.xmlで定義したThemeをAndroidManifest.xmlの<application theme="{theme}">や<activity theme="{theme}">に指定する事で、アプリ全体やActivity毎の見た目を設定可能です。
ただし、Fragment毎に指定する機能は提供されていませんでした。
Themeの指定
themeはAndroidManifest.xmlで指定しました。
<application>に指定するとアプリ全体の背景色や文字サイズに適用されます。
<activity>に指定するとActivityの背景色や文字サイズに適用されます。
Android5.0以上ではレイアウトXMLのViewGroupにも指定可能です。
<LinearLayout theme="{theme}">や<ConstraintLayout theme="{theme}">のように指定するとViewGroup内が適用範囲になります。
Styleの指定
StyleはThemeの適用範囲を1つのViewに限定したものです。
定義はThemeと同じでtheme.xmlの<style>で行います。
レイアウトXMLで<TextView style="{style}">のように指定しします。
ViewGroupに適用しても、Themeと異なり内側の要素に継承されません。
FragmentにThemeを適用する
FragmentのThemeをxmlで指定する機能は提供されていない為コードから指定します。
Theme(Style)をコンストラクタで指定可能なThemedFragmentを作成しました。
onCreateView()でLayoutInflaterを差し替えています。
// テーマの指定が可能なFragment
abstract class ThemedFragment(@LayoutRes val layoutRes: Int, @StyleRes val styleRes: Int) : Fragment(layoutRes) {

    override fun onCreateView(inflater: LayoutInflater, container: ViewGroup?, savedInstanceState: Bundle?): View? {
        // Themeを適用したContextを作る
        val themedContext = ContextThemeWrapper(context, styleRes)
        // Themeを適用したLayoutInflaterを作る
        val themedInflater = inflater.cloneInContext(themedContext)
        // レイアウトの生成に使用するinflaterを差し替える
        return super.onCreateView(themedInflater, container, savedInstanceState)
    }
}

// Fragment毎のレイアウトとThemeを指定する
class SampleFragment : ThemedFragment(R.layout.fragment_first, R.style.Theme_StyleSample_Red)
{
    override fun onViewCreated(view: View, savedInstanceState: Bundle?) {
        super.onViewCreated(view, savedInstanceState)
        //  Fragment固有の処理
    }
}
※サンプルコードはandroidxのFragmentを継承しています。
ステータスバーの色をFragmentのThemeで指定する
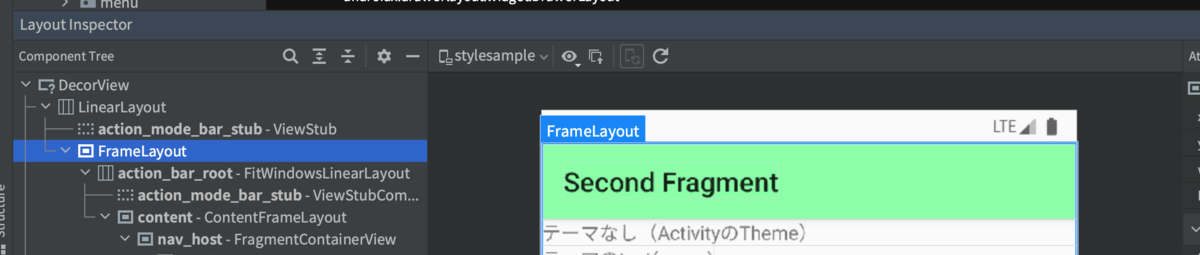
FragmentにThemeを適用する事例はすぐに見つかったのですが、ステータスバーの色が変わらない事に気づきました。
LayoutInspectorで調べると、Fragmentの描画範囲にステータスバーが含まれていませんでした。
試行錯誤の結果、以下でステータスバーの色を変更できる事がわかりました。
システムが描画するステータスバーの色を透明にする事で、ディスプレイ全体に広がったFragmentの背景色が、ステータスバーの色として表示されるという仕組みです。
- Fragmentの描画範囲をディスプレイ全体まで広げる
- ActivityのThemeで、ステータスバーの色(
android:statusBarColor)を、透明(@android:color/transparent)にする - FragmentのThemeで、背景色(
colorPrimaryDark)を、表示したいステータスバーの色にする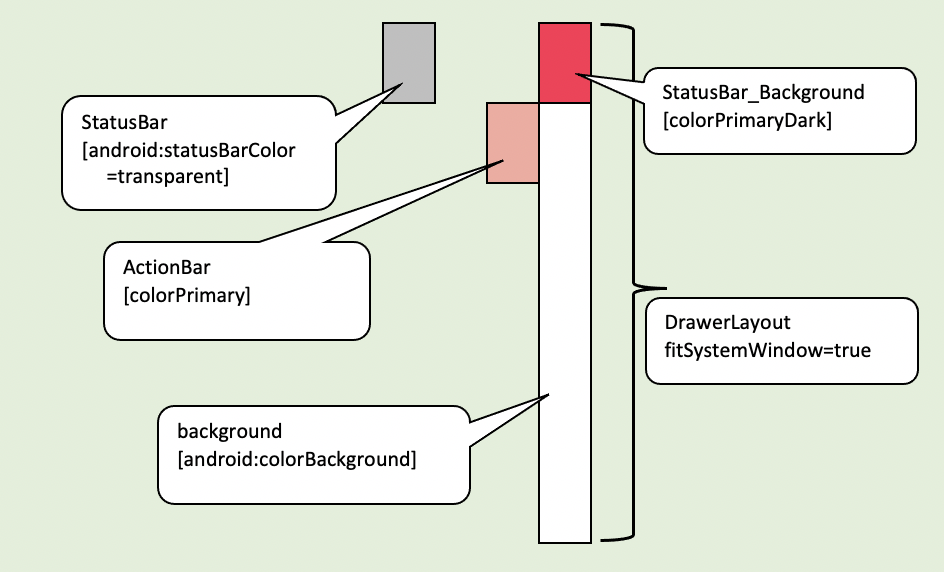
ステータスバーの背景色を設定する
※サンプルは、下記の組み合わせで確認しています。
| ライブラリ | パッケージ | バージョン |
|---|---|---|
| AndroidX | androidx.core:core-ktx | 1.7.0 |
| マテリアルデザイン | com.google.android.material:material | 1.4.0 |
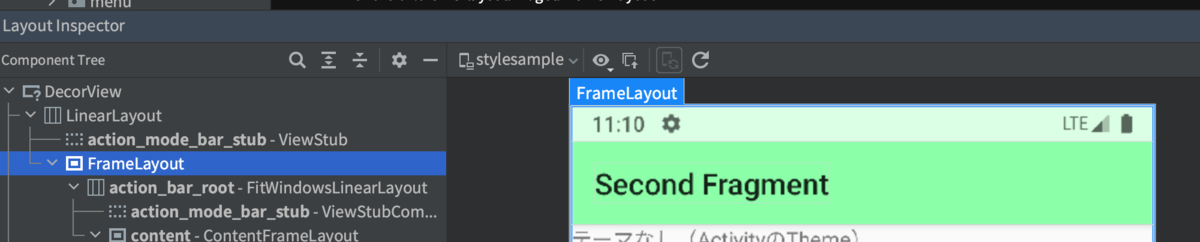
Fragmentの描画範囲をディスプレイ全体に広げる
Activityのルート要素をFragmentContainerViewにします
Activityのレイアウト
activity_main.xml
<?xml version="1.0" encoding="utf-8"?>
<androidx.fragment.app.FragmentContainerView
    xmlns:android="http://schemas.android.com/apk/res/android"
    xmlns:tools="http://schemas.android.com/tools"
    xmlns:app="http://schemas.android.com/apk/res-auto"
    android:id="@+id/nav_host"
    android:layout_width="match_parent"
    android:layout_height="match_parent"
    android:name="androidx.navigation.fragment.NavHostFragment"
    app:defaultNavHost="true"
    tools:context=".MainActivity"
    app:navGraph="@navigation/nav_graph"/>
Fragmentのレイアウト
Fragmentのルート要素をDrawerLayoutにしてfitSystemWindow="true"を指定します。
(ルート要素がConstraintLayoutやLinearLayoutだとステータスバーの背景色が変わりません)
fragment_first.xml
<?xml version="1.0" encoding="utf-8"?>
<androidx.drawerlayout.widget.DrawerLayout
    xmlns:android="http://schemas.android.com/apk/res/android"
    xmlns:app="http://schemas.android.com/apk/res-auto"
    xmlns:tools="http://schemas.android.com/tools"
    android:layout_width="match_parent"
    android:layout_height="match_parent"
    android:orientation="vertical"
    tools:context=".FirstFragment"
    android:fitsSystemWindows="true">

</androidx.drawerlayout.widget.DrawerLayout>
Activityのテーマで、ステータスバーの色を透明にする
theme.xml
android:statusBarColorに@android:color/transparentを指定します
    <style name="Theme.StyleSample" parent="Theme.MaterialComponents.Light.NoActionBar">
        <item name="android:statusBarColor">@android:color/transparent</item>
    </style>
Fragmentのテーマでステータスバーの背景色を指定する
colorPrimaryDarkでステータスバーの背景色を指定します
    <style name="Theme.StyleSample.Red">
        <!-- ActionBarの色-->
        <item name="colorPrimary">@color/red</item>
        <!-- ステータスバーの色  -->
        <item name="colorPrimaryDark">@color/red_status_bar</item>
    </style>
ステータスバーの文字を黒色にする
ステータスバーの背景色は変更できたのですが、今度はandroid:windowLightStatusBar="true"が反映されない事に気づきました。
android:windowLightStatusBar="true"はステータスバーの背景色が明るい色のときに使用するもので、ステータスバー上の文字やアイコンが黒色になります。
こちらもxmlでは指定できない為、Fragmentが遷移した際のイベントで、コードから動的に変更する事にしました。
Style値の取得
xmlで指定された値(true/false)をコードから取得するUtilityを作成しました。
object StyleUtil {
    fun getWindowLightStatusBar(context: Context, @StyleRes styleRes: Int?): Boolean {
        val themedContext = if (styleRes != null) {
            ContextThemeWrapper(context, styleRes)
        } else {
            context
        }
        val typedArray = themedContext.theme.obtainStyledAttributes(
                intArrayOf(android.R.attr.windowLightStatusBar)
        )
        val isLight = typedArray.getBoolean(0, false)
        typedArray.recycle()
        return isLight
    }
context.theme.obtainStyledAttributes()を使用すると、themeに指定されているstyleの値を取得可能です。
windowLightStatusBarの動的な変更
childFragmentManager.addOnBackStackChangedListener{}のイベントでFragmentに指定されたstyleを取得して、ステータスバー文字色を変更します。
findNavController().addOnDestinationChangedListener{}のイベントを使用したくなるところですが、DestinationChangedイベントが発生した時点では、まだ遷移先のFragmentが生成されていない為、スタイルを取得できません。
class MainActivity : AppCompatActivity(R.layout.activity_main) {

    override fun onCreate(savedInstanceState: Bundle?) {
        super.onCreate(savedInstanceState)

        val navHost = supportFragmentManager.findFragmentById(R.id.nav_host)!!
        navHost.childFragmentManager.addOnBackStackChangedListener {
            val currentFragment = navHost.childFragmentManager.fragments.firstOrNull()
            val isLight = StyleUtil.getWindowLightStatusBar(
                    this,
                    (currentFragment as? ThemedFragment)?.styleRes
            )
            setLightStatusBar(isLight)
        }
    }

    private fun setLightStatusBar(isLight: Boolean) {
        if (isLight) {
            window.decorView.systemUiVisibility =
                    window.decorView.systemUiVisibility or View.SYSTEM_UI_FLAG_LIGHT_STATUS_BAR
        } else {
            window.decorView.systemUiVisibility =
                    window.decorView.systemUiVisibility and View.SYSTEM_UI_FLAG_LIGHT_STATUS_BAR.inv()
        }
    }
}
サンプルコード
https://github.com/tijins/ThemedFragment
まとめ
この記事は弥生アドベントカレンダー2021の13日目です。
ActivityとFragmentが複雑に絡み合ったアプリをリファクタリングにしてスッキリした新年を迎えたいですね。
お知らせ
弥生のモバイルチームでは、Android、iOSのエンジニアを募集中です!! herp.careers